Multi-Factor Authentication (MFA)
DUO + Microsoft Authenticator
Multi-factor Authentication (MFA) will be Mandatory with M365 Accounts for all registered Students, October 15, 2024
The University of Regina uses two MFA Authentication systems.
- Microsoft Authenticator is required for employees to access Microsoft’s M365 Office suite, including email. It will be required for students when rolled out in Fall 2024.
- It is used to periodically approve your login on the MS Authenticator app on your mobile device.
- DUO is required periodically by employees to log in to select UofR applications, using the DUO app on your mobile device.
MFA Authentication Devices:
- Mobile device apps for Duo and Authenticator are provided through Apple and Android online stores.
Multi-Factor Authentication (MFA), also known as Two Factor Authentication (2FA), adds an extra layer of security to University of Regina accounts to protect you, your data, and University systems from attacks on your account, which could result in unauthorized access to your accounts.
- Verifying your identity using a second factor, such as your mobile device, prevents others from accessing your accounts, even if they know your password.
Systems and users configured for MFA will require two forms of authentication to verify your identity when logging into University of Regina services:
- Something you know: your Uregina.ca username and password.
- Something you have: a physical device (such as mobile phone, tablet, backup code, or hardware token). This is the proof required to access your account beyond that of a password.
The "something you have" is the second factor used for authentication, and why MFA is also called two-factor authentication.
- By requiring you to verify your identity with something in your possession, MFA adds another layer of security in front of the information, accounts, and assets you access online (even in the event your password is stolen).
- Once enrolled, you will be able to deny access to your accounts if someone else is trying to sign in as you.
- Authenticator and Duo are applications from different companies that provide similar MFA services to secure applications. UofR is using each of these MFA tools to secure the different applications (software) it provides.
- The DUO MFA app is currently used to access some uregina systems if you are an employee.
- The MS Authenticator app is used by employees and soon by students to access M365.
- Use of these MFA services is being expanded to include more applications.
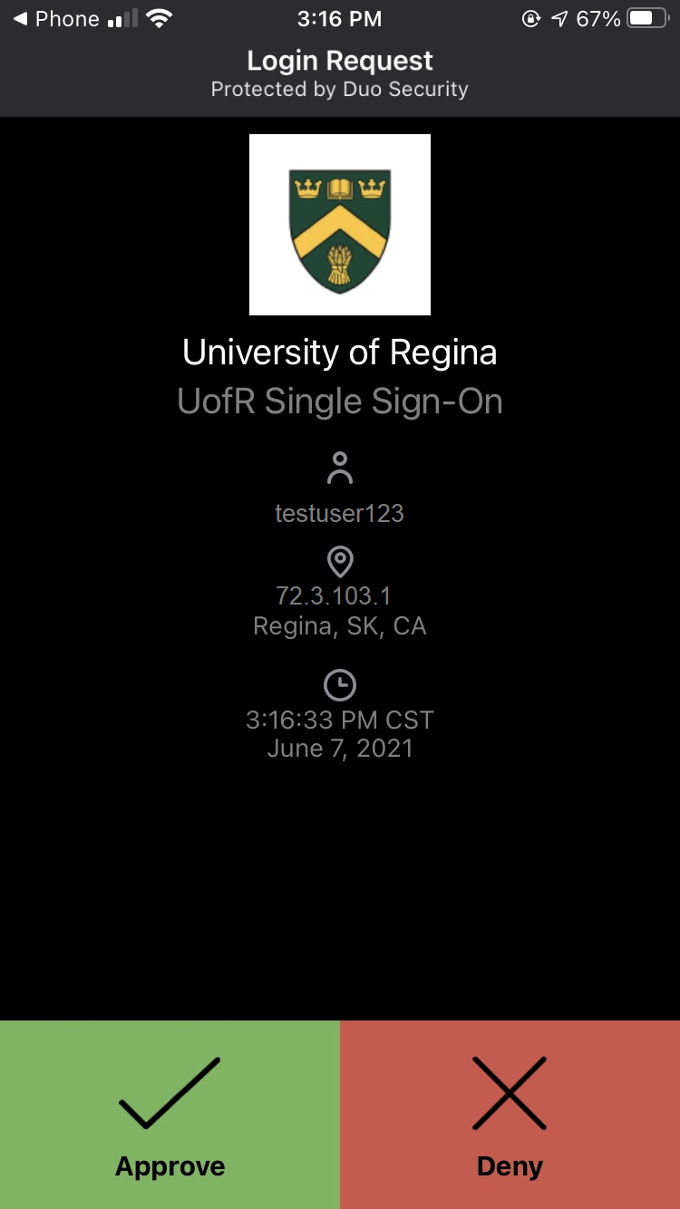
Once a user is enrolled in MFA, an authentication against an MFA enabled application happens like this:
- The user logs in to the University of Regina website or service with their username and password.
- The password is validated by an authentication server, and if correct, the user becomes eligible for the second factor.
- The authentication server sends a unique push to the user’s second-factor device.
- The user confirms their identity by approving the additional authentication from their second-factor device. If you approve the authentication, you are automatically logged in. Importantly, you will be able to deny access to your accounts (on your MFA-enrolled device) if someone else is trying to sign in as you.
- This process takes just seconds!
Duo Security is the solution used for MFA at the University of Regina for secure authentication to MFA-enabled systems. You may also hear MFA referred to as Duo.
- Duo is a leader in MFA technology, and is the most widely used product in the higher education space for MFA.
- Hundreds of universities and millions of accounts use Duo.
- Duo is engineered to provide a simple, streamlined login experience while boosting security.
Duo's service can use a mobile app or hardware token to authenticate you. It can be combined with other authentication factors like username and password authentication to create multifactor authentication.
- Most people use Duo via Duo Mobile (the mobile app), which runs on a variety of smartphones and tablets.
- To learn more about Duo MFA, you can visit the vendor's website: Duo Multifactor Authentication.
- To review information about what data is used by Duo, and how it is protected, please see Duo Mobile Privacy Information and Duo Privacy Data Sheet.
- MS Authenticator is an MFA application similar to the DUO MFA that you may already use to access some uregina systems.
- MS Authenticator will be needed to access your Microsoft account (username@uregina.ca / password)
- See, M365 Authenticator for more info.
- MFA is required as passwords are no longer sufficient, by themselves, to ensure accounts remain secure. Unfortunately, account breaches due to compromised credentials are becoming more common.
- With an increasing number of passwords to remember, people are prone to re-use the same passwords for many accounts or use weak passwords, which can easily be guessed. When other non-University services (social networks, websites, etc.) have breaches, these, in turn, can lead to your credentials being compromised and used to access University information.
- Even with strong passwords, attackers continue to launch targeted phishing attacks designed to steal passwords regardless of length and strength.
- Passwords, when partnered with MFA, provide much stronger protection to your accounts. Password + Proof = Secure Access.
Why Use MFA?
The University of Regina is dedicated to meeting the changing demands that employee mobility has placed on the institution.
- Employees need access to data from anywhere, at any time, and from any device they choose.
- No longer is data created and consumed on campus from managed systems, which creates a new set of security challenges that all higher-ed institutions must meet.
- Providing secure access to authorized users while keeping out unauthorized bad actors is the goal of multi-factor authentication.
Get Cyber Safe with MFA!
- It’s critical to protect access to applications and data so that private information remains private.
- Since the vast majority of compromised data results from a compromised password, it is clear that passwords alone are no longer sufficient.
- An extra layer of security is required to provide secure access to the resources and applications employees leverage to support their job functions.
- Enter Muti-factor authentication. Security experts agree that adding MFA to your account is the single most impactful thing you can do to secure your accounts.
- Make no mistake; University accounts are targets to attackers.
- As a result, we experience compromised accounts.
- An unauthorized actor could use a compromised account to do anything that the account has permissions to do.
- Impersonate you, copy your files, delete your data, or perhaps even install software (such as ransomware!).
- Adding a second layer of authentication on top of a password prevents criminals from accessing accounts by more than 96%.
- The University of Regina, Information Services has partnered with Duo Security and Microsoft to provide MFA to account holders.
- Microsoft and Duo are trusted leaders in MFA services.
- More than 300 educational institutions in North America have partnered with Duo and Microsoft to provide users with secure access to the data, resources, and applications they offer.
- Duo has a broad range of integrations and compatibility to support a broad coverage of MFA across our application inventory. Authenticator is used for M365.
- Microsoft Authenticator and Duo’s ease of use has made this a popular choice for higher ed’s diverse user groups.
- MFA represents the new minimum standard for securing end-user access to data.
- Service providers such as Google, Apple, Facebook, banks, and governments all now support or require MFA to access accounts.
- Universities are no different; our accounts contain valuable information and require similar levels of protection.
- A 2020 survey of Canadian colleges and Universities indicated that 70% have MFA in place, with another 16% in the process of implementation.
- The University of Regina is now joining the majority of our peer institutions by using MFA.
- The University of Regina receives thousands of malicious attempts to authenticate per day.
- Automated attacks use large volumes of password guessing to brute force accounts.
- Or they leverage previously compromised passwords in external data breaches against our accounts.
- MFA is highly effective in preventing success in these types of attacks.
- Bots don't have your phone or token, and certainly don't have thumbs to press accept on a phone screen.
- Phishers are more aggressive and persistent than ever. In the last year, the University of Regina has had 520 phishing attacks reported.
- Each attack may involve dozens or even hundreds of targeted individuals.
- Even more, attacks may go unreported. MFA minimizes the impact of a successful phishing attack.
- Even if a password is given away to fraudsters, it is useless against MFA-enabled services.
- As we enroll more users and include more applications in our MFA deployment, the greater the benefit achieved against these types of attacks.
80%
Breaches caused by Password Compromise
70%
Canadian Higher Ed Using MFA
99%
Effectiveness Against Automated Bot Attacks
520
Reported UR Phishing Attacks in Last Year