How to Setup Novell Directory Permissions
Computing Services Technote #608 v1.1
Title: How to Setup Novell Network Directory Permissions
Applies to: UofR Employees and staff
Section: Network
Owner: Team Lead, File & Print, Network & Communication Services
Last updated: Nov. 19, 2014
Introduction
This note describes the procedures to setup Novell network directory permissions. The note describes three typical scenarios of directory permissions setup:- Give directory access-rights to university staff or employee.
- Prevent rights from being inherited from parent directories using Inherited Rights Filters (IRF).
- Give directory access-rights to a student.
Explanation of Novell Rights
On a Novell network drive(T: for example) a user must have rights(permissions) assigned to a directory(or parent directory) before they are able to see the directory. If a user has rights to a directory they are called a “Trustee” of that directory. You must have the Access Control right to change and view trustee assignments.
Although trustee rights can be assigned to files this is almost always a bad idea because of the way many programs work, including Microsoft Office. If it is necessary to grant different rights to a file you should put it in separate subdirectory.
Give Directory Access-rights to University Staff or Employee.
- In windows explorer window, right click on the network directory for which you want to change access rights, and select “Trustee Rights”.
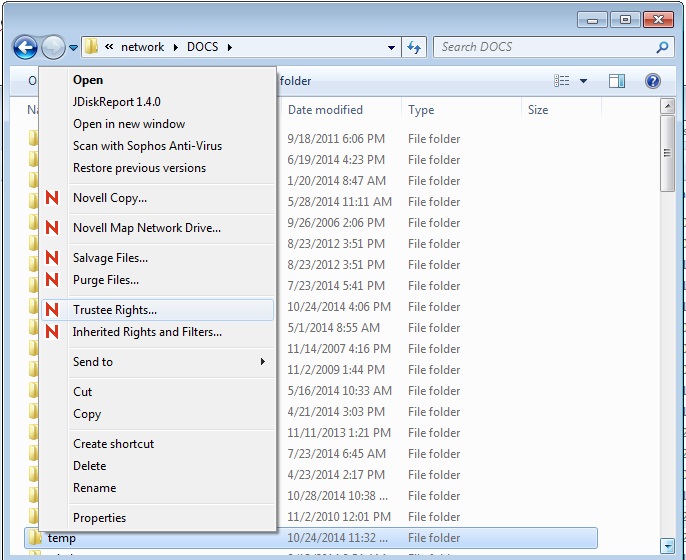
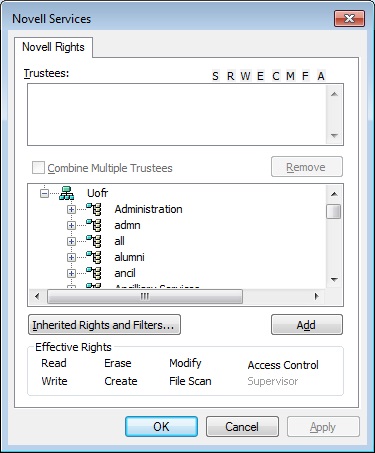
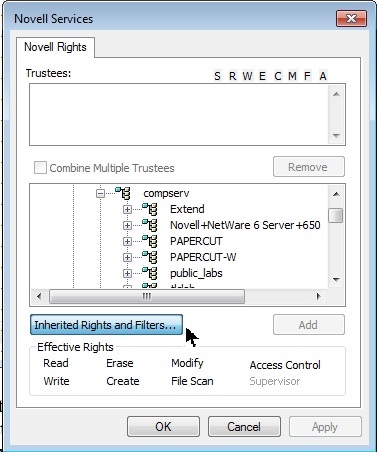
- This brings up the Novell Rights window. In the top section, it shows the list of trustees assigned to this directory. In the middle section, it displays the list of university staff and employees grouped by department (or faculty).
-
By clicking on the + sign, you can navigate to see list of employees, roles and groups.
-
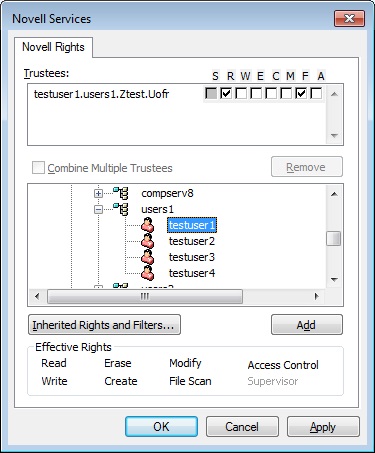
Select employee and click on the “add” button to assign directory access rights to this employee.
-
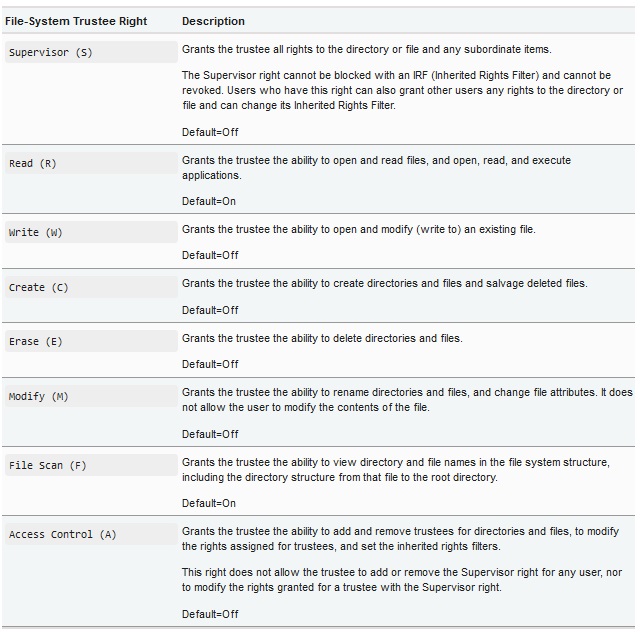
By default, when adding a trustee, they receive two rights: R (Read) F (File Scan). Other rights can be added as desired by checking the appropriate box. Then, click Apply to save the changes.
-
As a best practice guide:
-
If you want to assign “Read Only” access, the default R & F rights are enough for the user to see the files and read them, but not edit or save.
-
For most collaborative purposes (to assign “Read and Write” access), you will assign RWECMF rights (all rights except A). This will give the user the rights to open, save, modify, create and delete files and directories.
-
Professors can assign trustee permissions to all students in a class as a group. Class groups are automatically created each semester and members are updated daily. Class groups can be found in .classes.uofr context.
-
If you want the user be able to add/modify/view the trustee rights, you can add the A (Access Control) right.
-
To determine the username for a UofR staff or Student, you can search for the user using the "jblookup.exe" utility as explained in Appendix A.
-
To determine the novell username for a specific user id, you could probably lookup the birthdate in Banner and then goto https://accountapps.uregina.ca/cgi-bin/cgiwrap/root/studentlookup.pl to find the username.
-
It is best to use position numbers(Novell calls these Organization Roles) as trustees as that way the rights automatically pass onto new employees who fill that position/role. For example, instead of granting permissions to haidl.compserv.is.uofr it would normally be better to add csv023NetManager.compserv.is.uofr as a trustee. Sometimes permissions should be assigned to the user instead of the role, for example, when the user is a part of a hiring committee it is common that it is the individual being selected rather than their role. Roles generally are only created for staff and not for faculty members. As explained in Appendix A, the "jblookup.exe" utility can be used to determine the role assigned to a user. In addition, Appendix B shows how to list the occupants of roles. If a role doesn’t exist and you would like one created please ask one of your department/faculty account administrators to put in a footprints account request to create the role and assign the permissions.
-
-
The following table shows the list of trustee rights their description. Note the supervisor right cannot be changed as it is needed to allow backups to work as well as other system administration tasks.
Prevent rights from being inherited from parent directories using Inherited Rights Filters (IRF).
-
Normally if a user has rights to a directory these rights flow down to all subdirectories. For example, if a trustee(user) has rights to T:\compserv they would also have rights to T:\compserv\Office(or any other directory created under T:\compserv). This flow of rights down to subdirectories can be blocked for a subdirectory with an inherited rights filter (IRF).
-
To modify the IRF, You can click on “Inherited Rights and Filters” button in the “Novell Rights” window but before doing this - make sure you grant yourself rights to the directory including access control rights(A) or you will also block yourself and will need to put a ticket in to have it fixed. While you are adding yourself, it is a good time to add the others trustees you want to have access to this directory.
-
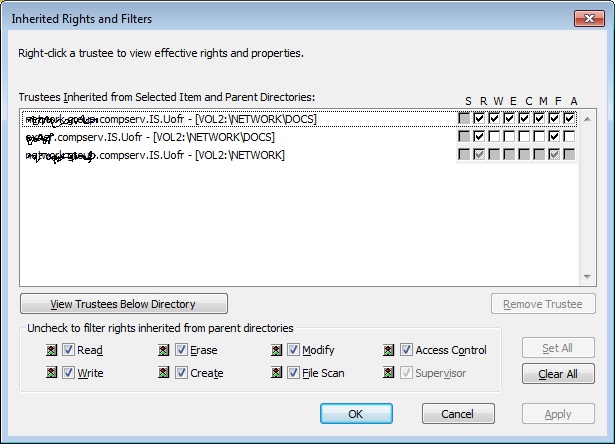
This brings up the “Inherited Rights and Filters” window. In the top section, it shows the list of trustees assigned to this directory and all parent directories. Although it is possible to remove trustees of parent directories from this section, it is strongly recommended not to do this. This may affect trustee rights assigned to other directories. In the bottom section, you can prevent (or allow) the rights from being inherited from parent directories. By default, all the rights are checked which means that the rights inherited from above flow through to this directory. You can un-check the rights to restrict the access to only the users granted explicit rights to this directory.
<
Give Directory Access Rights to a Student
To give access rights to a student, the procedure described in the first section will not work due to the large number of students in the all.uofr context - your computer will sit "thinking" for what seems like forever if you try to browse all.uofr. Instead, a command line tool should be used as follows:
-
Open the Command Prompt window by clicking the Start button , clicking All Programs, clicking Accessories, and then clicking Command Prompt.
-
Edit the following command by replacing "<Directory Name>, <Rights> and <Username> with the desired values. Then copy the command to Command Prompt and press enter:
y:\PUBLIC\jrbutils\settrust.exe "<Directory Name>" <Rights> /n=".<Username>.all.Uofr"
-
For example if you want to give a student ( UofR username: john123x) read and write access to a directory (T:\engineering\public). The following command should run:
y:\PUBLIC\jrbutils\settrust.exe "T:\engineering\public" RCWEMF /n=".john123x.all.Uofr"
-
Another example if you want to give the student “read only” access to the directory, the following command should run:
y:\PUBLIC\jrbutils\settrust.exe "T:\engineering\public" RF /n=".john123x.all.Uofr"
-
To confirm it worked, in a windows explorer window, right click on the directory and select “Trustee Rights”. You should find an entry with the student username and the assigned rights.
Conclusion
Procedures for granting permissions to directories on Novell drives are described
References
To read further details on the Novell trustee model see https://www.novell.com/documentation/windows_client/windows_client_user/data/bwfnnvo.html
Revision History
v0, 2014-11-17, Initial version
v1, 2014-11-17, Added section on viewing roles
v1.1, 2014-11-19, Added section on user search
Appendix A: UofR User Search
A utility called "jblookup.exe" can be used to search for UofR users (both staff and students) using any user attribute. This utility can also be used to show the roles and groups assigned to the user. For example, to search for a user using user's last name:
- In windows explorer, navigate to Y:\PUBLIC\jrbutils directory and run "jblookup.exe" program (Y:\PUBLIC\jrbutils\jblookup.exe).
- In "Search for:" field, write the user's last name (or part of it).
- In "Attribute: " field, select (or write) Surname.
- Click "Find".
- The detailed information for the specified user should show up.
Appendix B: List the Occupants of Roles
To show the occupants of a role:
- In windows explorer, navigate to Y:\PUBLIC\jrbutils directory and run "orgroles.exe" program (Y:\PUBLIC\jrbutils\orgroles.exe).
- In "Organizational role:" field, click on "Browse" button.
- All university roles should show up grouped in university departments and faculties. Navigate to the role and click OK.
- Click display to list the occupants of the selected role.