Mapping Network Drives From Home or Un-managed Windows Systems
Computing Services Technote #629
Introduction
Procedures for mapping and using the network drive(s) from home or from a non-managed Windows systems are described.
General
There are several options to map the network drive(s). A script file can be used to map the drives on demand to your system. You may also use native Windows tools for custom mapping.
Note that if you are off campus you will have to be connected to the UofR VPN.
Option 1: Using a mapping script
Pre-requisites:
- If off campus, the UofR Fortinet SSL VPN is installed and tested
- Make sure to have granted rights to access the desired share path
Installation Steps:
- Download the file https://app2.uregina.ca/Connect-UofR-Shares-v4.bat and move the file to your desktop
- Connect to the UofR VPN if off campus
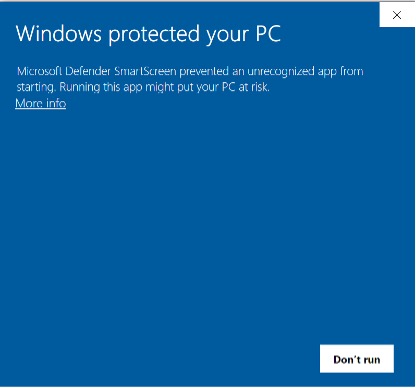
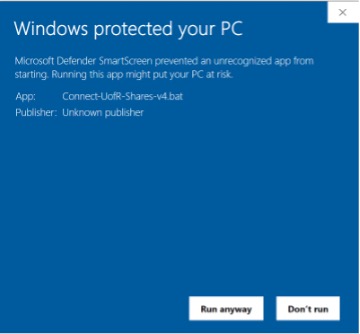
- Double click on the Connect-UofR-Shares-v4.bat file on your desktop. If the window

Pops up, click on More Info 
And then click on Run Anyway.
4. You will be prompted to enter your uregina username (note: just the username – you don’t need to append @uregina.ca) followed by your password.
5. The S: and T: drive will then be mapped. (see section below if you need other drives)
Mapping other drives:
If you need to map other drives such as the Arts O: drive you need to edit the Connect-UofR-Shares-v4.bat and uncomment the appropriate line:
- Right click on the Connect-UofR-Shares-v4.bat on your desktop and choose edit.
- Find the line with your drive letter and delete “rem” from the start of the line to uncomment it.
For example, change:
rem net use O: \\ad.uregina.ca\uofr\Arts > nul 2>&1 to
net use O: \\ad.uregina.ca\uofr\Arts > nul 2>&1
- Save the file.
Option 2: Manual drive mapping
Pre-requisites:
- If off campus, the UofR Fortinet SSL VPN is installed and tested
- Have the address of the network share handy (ex.: \ad.uregina.ca\uofr\T-Drive\network)
- Make sure to have granted rights to access the desired share path
Installation Steps:
- Open File Explorer.
- Click on This PC or Computer in the left sidebar.
- Click on the Map network drive button in the toolbar at the top.
- In the dialog box:
- Choose a drive letter (e.g., T:\). Note that letter assignment is arbitrary for your machine, but try to follow the well-known letters as referred to by your unit/faculty.
- Enter the network share path (e.g., \\ad.uregina.ca\uofr\T-Drive\).
- Check Reconnect at sign-in if you want it to remount automatically.
- Check Connect using different credentials if needed.
- Click Finish.
- When prompted, enter your username and password if required.
Disconnecting and unmapping from network drive(s)
When you are done working with a network drive, you can disconnect from it by opening File Explorer and under This PC right-click on the network drive and click Disconnect.
Please note that if your machine is located off-campus, you will need to maintain connection to the UofR VPN, otherwise the network drive may become unresponsive in File Explorer.
If you experience issues with the share, open Command Prompt and use this command to unmap the drive (you can pick the drive letter):
net use T: /delete
Conclusion
The procedures for mapping and using the network drive(s) on home or non-managed Windows systems have been described.