Off Campus Access to Micro Focus Servers using the Micro Focus client
Computing Services Technote #511 v22
Title: Off Campus Access to Micro Focus Servers using the Micro Focus Client
Applies to: Users wishing to access work files on Micro Focus servers from off campus
Section: Network Services
Owner: Manager of File and Deployment Services
Last updated: 8 May 2023
Introduction
Campus users may wish to access data located on a Micro Focus (Novell) server from a computer that is physically located off campus but connected to the Internet. This document describes methods of doing this. As there is a degree of complexity associated with installing and configuring the Micro Focus Client on systems that are not located on campus, it is highly recommended that users consider using Webdrive or Netstorage service (see below). Netstorage is appropriate for users of all skill levels and requires that you only have a working web browser, such as Mozilla Firefox or Edge.
This technotes describes the installation and configuation of the OES client for Off-campus Access. If OES client was already installed and configured but login stopped working after June 1st 2023, skip to "Changes Needed after June 1st, 2023 For Off Campus Logins" section.
Support on Windows PlatformMore documentation on Information Services' supported Windows platforms and policies can be found on the Information Services webpage.
Alternatives
There are two alternatives to installing the Micro Focus client:- Use the Netstorage service that provides a secure web based interface to the Micro Focus servers. Unless you do a lot of work with files remotely this is likely the best alternative.
- Access the files by installing the Webdrive client. This maps a drive on your PC that emulates most of the normal functionality available in on campus drive mapping.
Prerequisites
Your system must be running Windows 10 with at least 800Mb of disk space free and have a working internet connection. You must have a login account on a Micro Focus Server at the UofR. This account is often referred to as a uregina.ca account.
Micro Focus Client Installation
You must first verify that your internet connection is working properly and that you have access to a local administrator account. Once you have done this, you can then install the Micro Focus client:
- At the time of this document's publication, the current client version for Windows 10 is V2 SP5 IR2. The client can be downloaded from here
- Create the directory c:\nwclient (or another directory) and move the file you just downloaded to it. Extract it by double clicking the file you just downloaded.
- Review the installation instructions in technote 510 before beginning the install.
- For systems that will be located solely or mostly off campus, the install instructions in technical note 510 should be used but the ZDM Agent install detailed in technical note 545 should not be used without first consulting network services.
- Be sure to review the System Login section below which contains information on how your login process will change now that the Micro Focus Client is installed.
- Be sure to make the changes specified in the Micro Focus Client Configuration section, specified below. Your system will not be able to contact the campus servers if you do not make these configuration changes.
The Micro Focus client should now be installed on your system.
Micro Focus Client Configuration
Logging into an unmanaged system with the Micro Focus client install differs from the normal procedure that occurs on campus.
- The first time you log into your system you will need to bypass the Micro Focus login using the Computer Only Logon option and configure your Micro Focus client properties, as described in the next section.
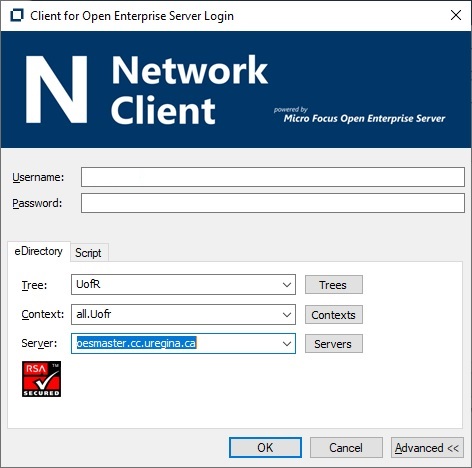
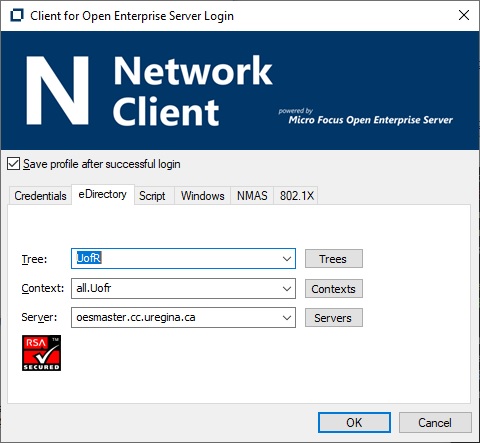
- When presented with the Micro Focus login prompt, it is necessary to set the NDS tree and context. This can be done by clicking on the Show Advanced Options button. You may have to enter the Micro Focus user name first before the advanced button can be used. The Tree should be set to "uofr"', the context should be set to ".all.uofr" and the server should be set to "oesmaster.cc.uregina.ca", in both cases without the quotation marks.
- Windows requires the use of login accounts to control access to the computer. On campus, the local accounts are synchronized with the Micro Focus accounts. However for off-campus systems that are not, and should not be, configured as managed systems, these accounts are not synchronized. As such you will have to log into Micro Focus and the local computer separately unless you manually synchronize your account names and passwords. Instructions for this are beyond the scope of this document.
- If the Micro Focus login is skipped or not available at system startup, the user can log into Micro Focus at a later time via the Micro Focus Client System Tray icon. The default icon for this install, as of this writing, will be a white N on a blue background. If you move the mouse pointer to this icon it will say "Client for Open Enterprise Server". Right click on that icon and then choose "OES Login...".
Login Problems after June 1st, 2023 For Off Campus Logins
Due to a denial of service vulnerability, as of June 1st 2023 the configuration of the OES client needs to be changed to allow logins from off campus. After June 1st 2023, your login will fail with the error message "The tree or server cannot be found. Choose a different tree or Server. Would you still like to try to login to Windows?" to login to Windows?" as shown in this screenshot
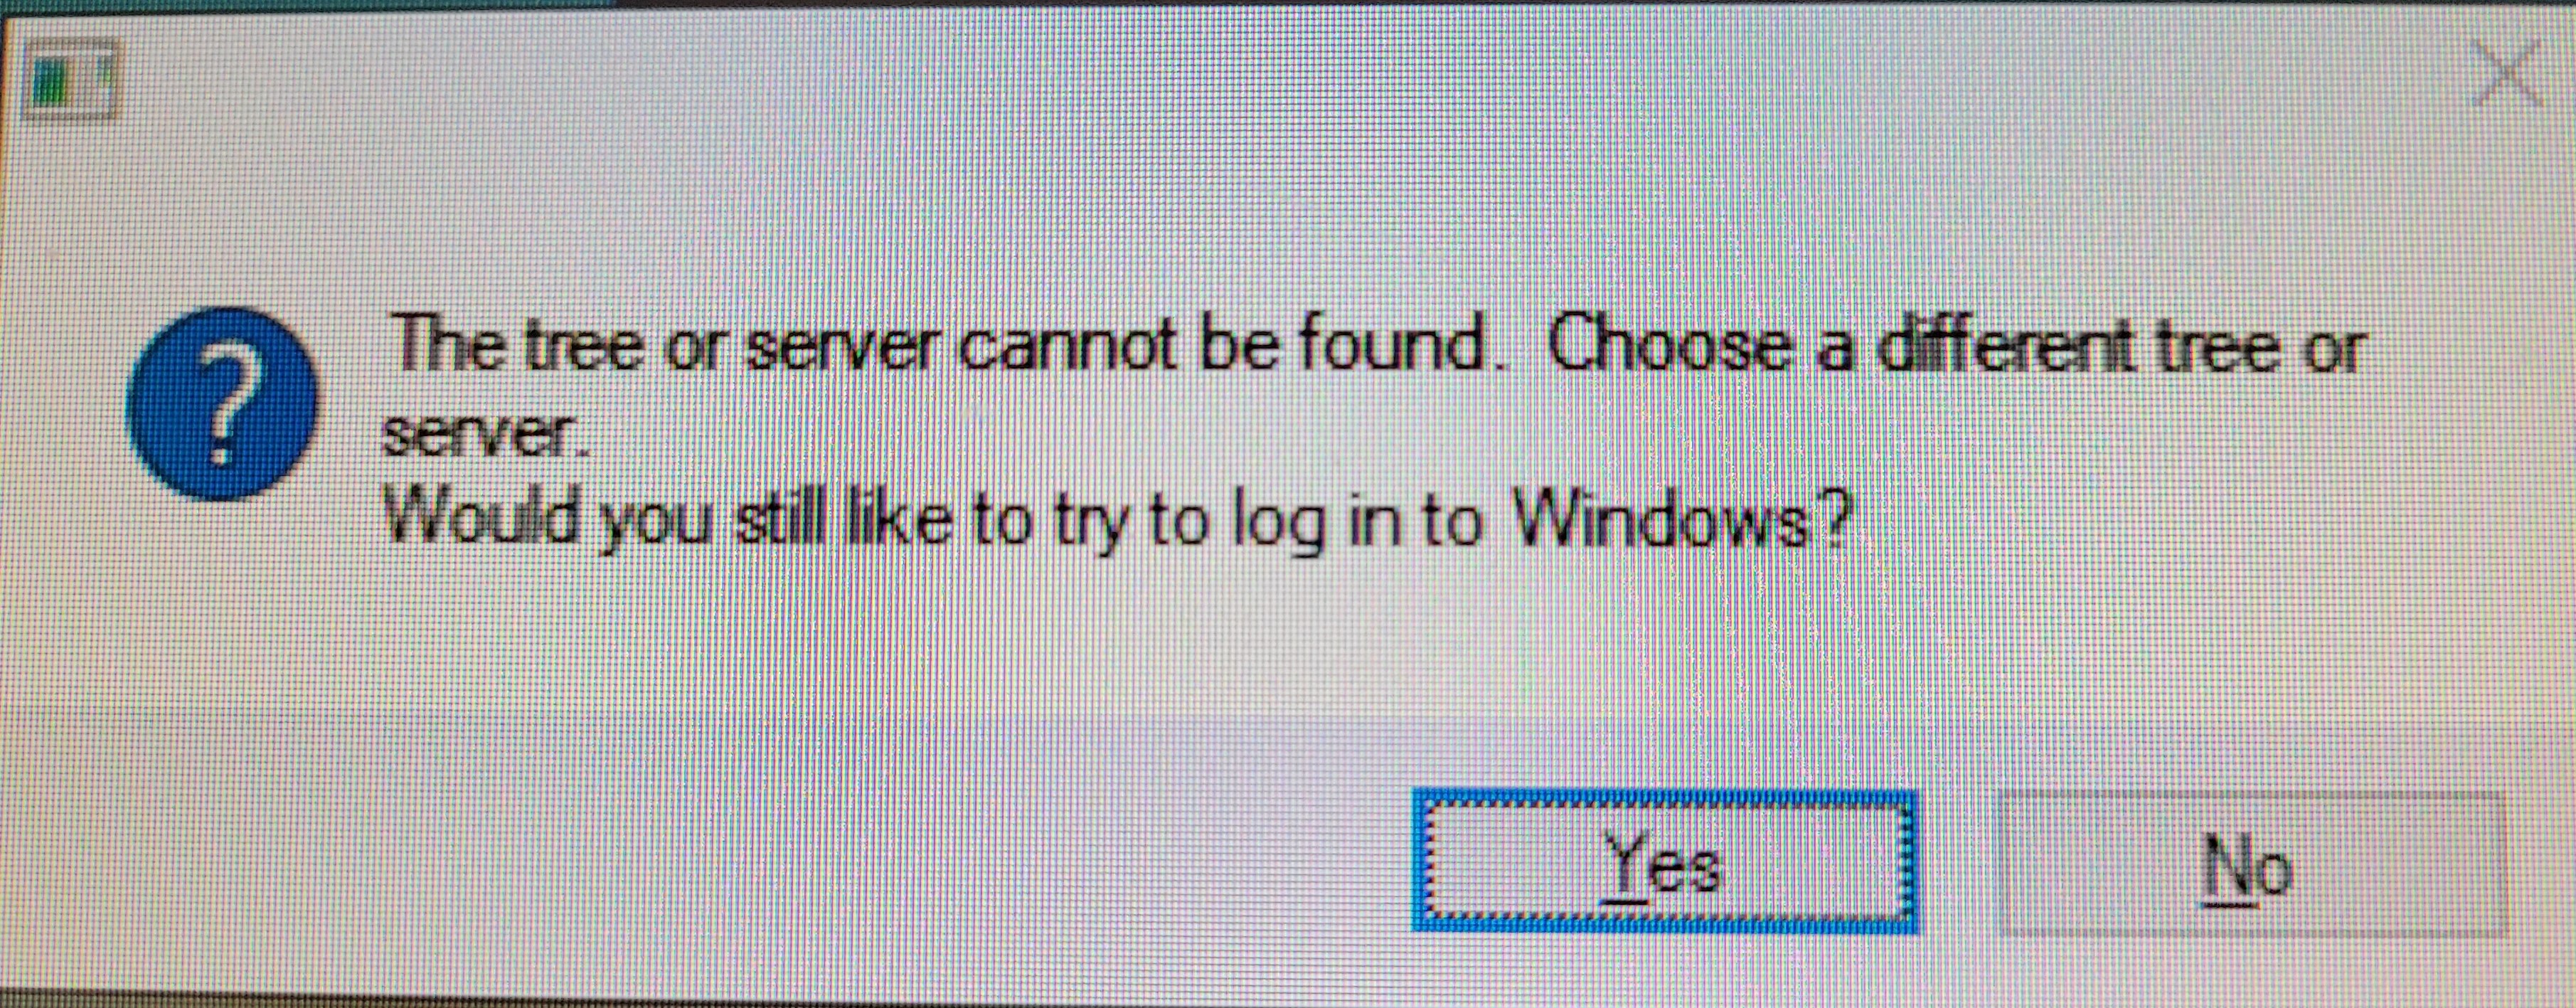
To Successfully login, in the OES login page, click on "Show Advanced Options" button, then in the server name text box, write "oesmaster.cc.uregina.ca" and click "OK". Login should complete succssfully with this change.
Those changes will allow you to login but will not survive reboot. You will have to follow those same steps everytime you login to your system.. To avoid this and permanently save those changes, follow the following steps.
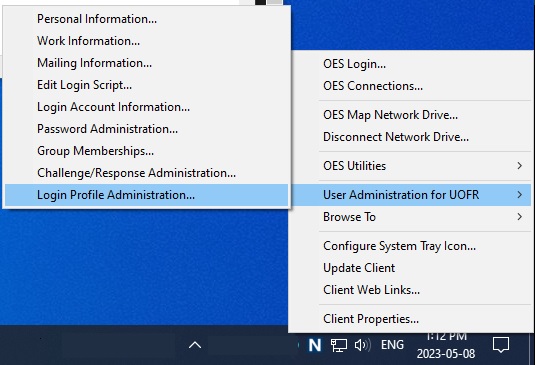
Changes Needed by June 1st, 2023After successfully login to your system, right click on the OES icon in Windows Taskbar, then select
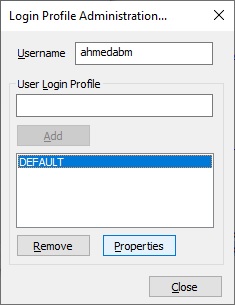
Highlight the DEFAULT Profile and Click Properties.
In Client for Open Enterprise Server Login Page, set the server to "oesmaster.cc.uregina.ca", check "Save Profile after Successful Login" checkbox and click OK
Troubleshooting
If you have trouble accessing Micro Focus from home verify the following- If you still have troubles connecting, select the advanced button on the main login screen and try entering the IP address 142.3.100.17 in the server field.
- If you are having trouble mapping a drive try using the IP instead of the server name (compserv3=142.3.100.3,compserv1=142.3.100.36,Compserv9=142.3.100.10 and Engineering=142.3.152.33). For example to map \\compserv1\vol1 use \\142.3.100.36\vol1
Conclusion
Procedures for logging into Micro Focus file servers from off campus locations are described.
Revision History
v0, 1997-07-05, Initial version(draft)
v3, 1999-10-19, instructions for disabling login script and manually mapping drives added.
v4, 2000-02-07, added troubleshooting tip to try server IP instead of name when mapping drive
v7, 2002-04-19, updated with additional help on downloading from Novell download site.
v8, 2002-04-19. updated with netstorage as alternative to Novell client
v10, 2003-10-08, when configuring nwdiragent added instructions to check staticbox and disable active discovery
v12, 2005-01-24, updated to include Windows XP information.
v13, 2005-08-11, updated IP address of Engineering server.
v14, 2005-11-29, reviewed for accuracy with release of Novell Client 4.91, no other changes.
v15, 2006-08-17, updated to reflect the removal of Win98 support
v16, 2006-08-31, updated to include compserv3 as commonly accessed server
v17, 2007-01-05, removed reference to urcomm
v18, 2012-09-01, changed server info for O: drive mapping and changed default suggested server from 142.3.100.18 to 142.3.100.10. Cleared out version update info that referred to old unused versions. Added references to Windows 7 and the use of the red N system tray.
v19, 2015-10-19, list most recent clients and update configuration instructions due to differences between XP and Windows 7.
v20, 2020-01-03, Remove XP. Add Windows 10. Change Novell to Micro Focus.
v21, 2022-02-23, Remove Windows 7, change some IP addresses.
v22, 2023-05-08, Add Off-campus Login to OES Section as per SLP changes