Software Release Notes
Alertus Stand-Alone Client for Windows 10 for students and staff non-Novell University-managed workstations.
Note: Alertus has not been tested at the UofR on any operating systems other than Windows 7/10. However, it should work on Vista as well.
1. Ensure you are logged into your workstation with an account that has administrator privileges.
2. If you haven't already done so download Alertus
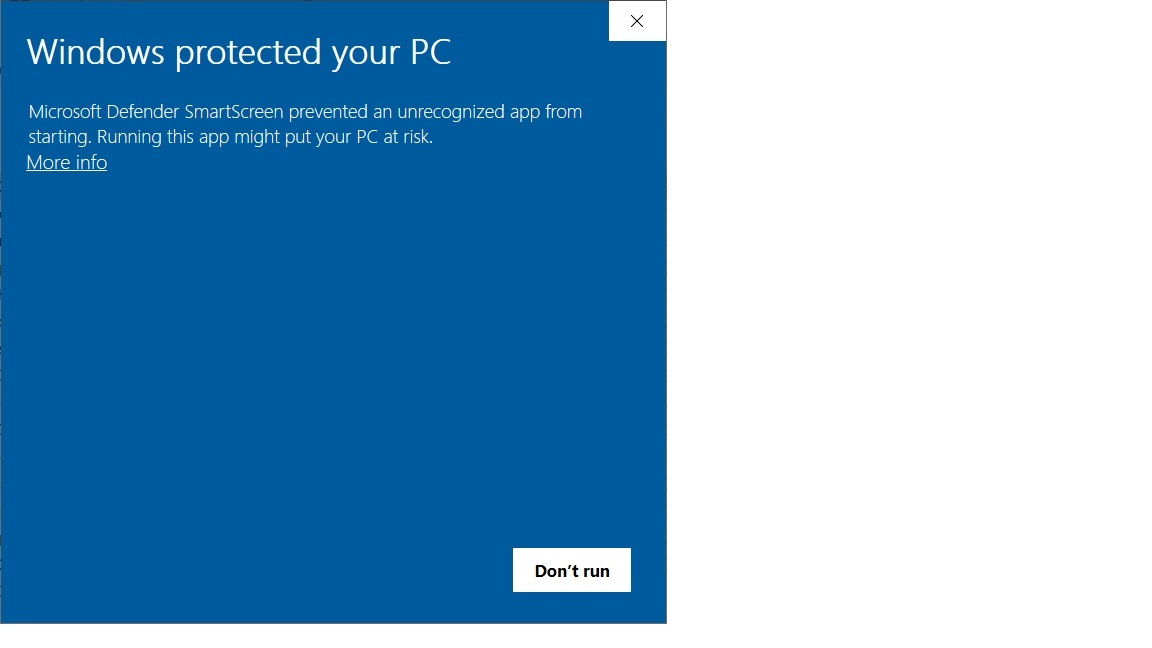
3. Find the alertussa.exe on your computer and double click it. If you see a "Windows protected your PC" message, please see instructions for handling this message.
4. You may receive a UAC prompt. As long as the Verified Publisher says University of Regina, then click 'Yes' to continue, otherwise click 'No' and contact the IT Support Centre for instructions.
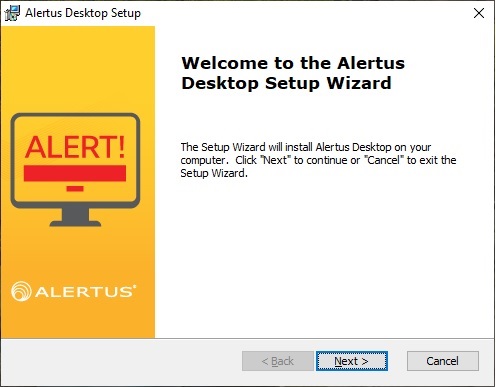
5. This is the first screen you will see. Click Next.
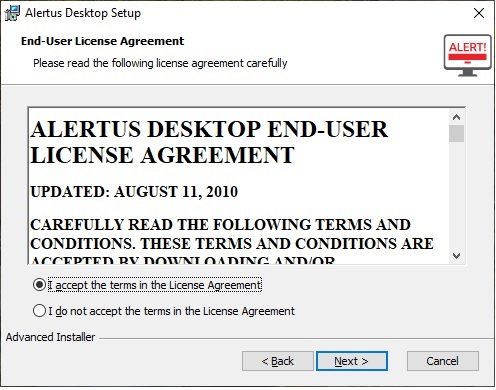
6. The second screen will appear. Ensure "I accept the terms..." is selected and click Next.
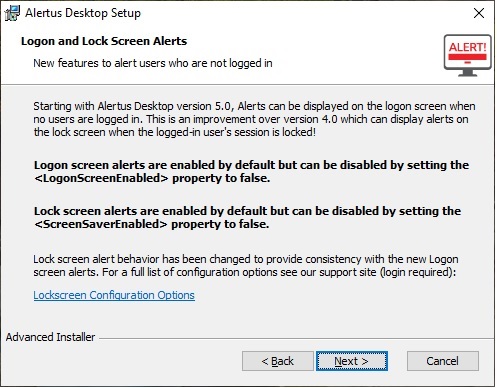
7. Screen 3. Read the information and click Next.
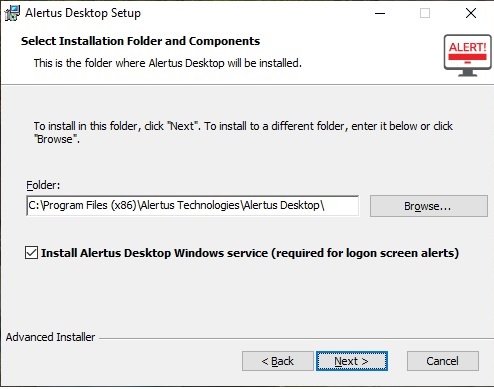
8. Screen 4. Click Next.
9. Screen 5. Click Install.
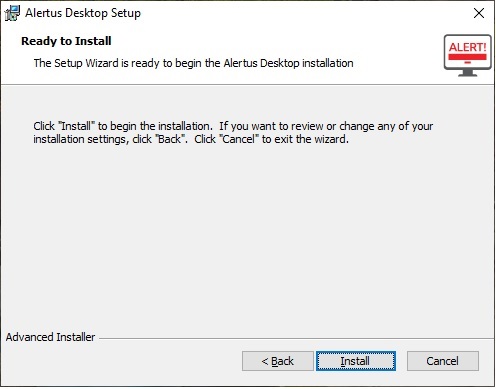
10. After a few moments screen 6 will appear. Click Finish.

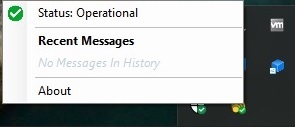
11. Alertus is now running and the Alertus icon will show up in the Windows Notification area.
![]()
12. Right click the Alertus icon to see your options (s/b as shown).
On Mac OS X version 10.7.5, 10.8 and later versions users may be warned that the Alertus installer is from an untrusted publisher. The appearance of this warning is entirely dependent on the security settings on the workstation where the Alertus software is being installed. Information Services is aware of the warning message but due to technical issues is not able to immediately resolve the issue.
If the installer was downloaded directly from the UofR downloads site, it is safe to install.For more information on why Mac users may receive this message and how to force the installation of the Alertus software, please visit the following Apple Support page at https://support.apple.com/kb/HT5290
This download software is for student use only.
If you see a "Windows protected your PC" message during installation, please see instructions for handling this message.
Once ArcGIS 2.8 is installed please download and run service pack 2 for ArcGIS 2.8. The name on the download site is called: ArcGIS Pro 2.8 for Windows SP2
The file downloaded is ArcGIS_Pro_282_177645.msp. Double click ArcGIS_Pro_282_177645.msp and follow the prompts.
For Faculty and Staff please contact the IS Service Desk to have the software installed and the proper licensing configured.
 Click on More info. You will then see the following.
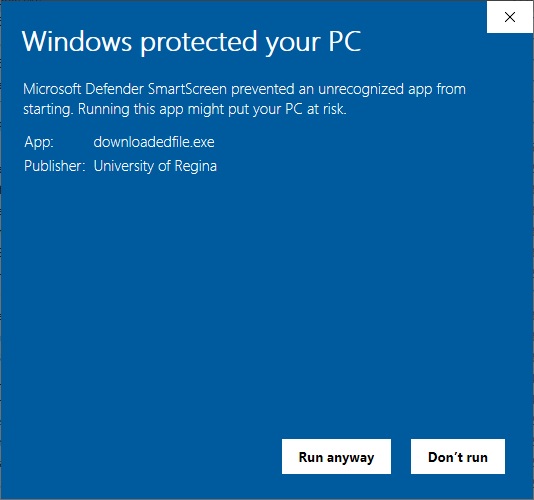
Next to App: ensure that the name matches the installer file you downloaded from the UofR website.
Next to Publisher: ensure that it says University of Regina
- If both are valid then click "Run anyway" or else click "Don't run" and contact the IS Service Desk (306-585-4685, or service.desk@uregina.ca) for help with this issue.
Download the installer file to the local hard drive. Double click to start the installation. If you see a "Windows protected your PC" message please see instructions for handling this message.
The installer will ask for administrator credentials.
The install will take less than a minute. For Papercut to become active you must reboot the computer.
If you access this software from the Start Menu, with UofR Software Distribution\Installers, then installation is automatic. If you downloaded the installer from the UofR web site, double click on the PuTTY_0.81_x64.exe to start the install.
0.81 fixes a critical vulnerability CVE-2024-31497 in handling 521-bit ECDSA private keys (also called "ecdsa-sha2-nistp521"). If you have used one of those with any previous version of PuTTY or Pageant, we recommend generating a new one, and removing the public key from all authorized_keys files!
Software Description
- The storing of hosts and preferences for later use.
- Control over the SSH encryption key and protocol version.
- Command-line SCP and SFTP clients, called "pscp" and "psftp" respectively.
- Control over port forwarding with SSH, including built-in handling of X11 forwarding.
- Emulates most xterm, VT102 control sequences, as well as much of ECMA-48 terminal emulation.
- IPv6 support.
- Support 3DES, AES, Arcfour, Blowfish, DES.
- Public-key authentication support.
- Support for local serial port connections.
Requirements
- A IBM compatible computer with Pentium processor or better
- Microsoft Windows Vista/Windows 7/8/10.
- 16Mb of RAM(32Mb of RAM highly recommended)
- 2Mb of free disk space
Licensing Terms
The PuTTY executables and source code are distributed under the MIT licence, which is similar in effect to the BSD licence. (This licence is Open Source certified and complies with the Debian Free Software Guidelines.)
Additional Documentation
- During installation if you see a "Windows protected your PC" message, please see instructions for handling this message.
- After installation an icon will be present in the Putty group of the Start Menu, as well as in the path C:\Program Files (x86)\Putty
- Starting a Session: Single clicking the Start Menu icon will launch the program and display a screen of default host sessions you may click on, or in the Host Name box, enter the Internet host name of the server you want to connect to. You should have been told this by the provider of your login account. Now select a login protocol to use, from the Connection type buttons. For a login session, you should select Raw, Telnet, Rlogin or SSH. When you change the selected protocol, the number in the Port box will change. This is normal: it happens because the various login services are usually provided on different network ports by the server machine. Most servers will use the standard port numbers, so you will not need to change the port setting. If your server provides login services on a non-standard port, your system administrator should have told you which one. (Once you have filled in the Host Name, Protocol, and possibly Port settings, you are ready to connect. Press the Open button at the bottom of the dialog box, and PuTTY will begin trying to connect you to the server.
- Logging in: After you have connected, and perhaps verified the server's host key, you will be asked to log in, probably using a username and a password. Your system administrator should have provided you with these. Enter the username and the password, and the server should grant you access and begin your session. If you have mistyped your password, most servers will give you several chances to get it right. If you are using SSH, be careful not to type your username wrongly, because you will not have a chance to correct it after you press Return; many SSH servers do not permit you to make two login attempts using different usernames. If you type your username wrongly, you must close PuTTY and start again. If your password is refused but you are sure you have typed it correctly, check that Caps Lock is not enabled. Many login servers, particularly Unix computers, treat upper case and lower case as different when checking your password; so if Caps Lock is on, your password will probably be refused.
- After Logging in: After you log in to the server, what happens next is up to the server! Most servers will print some sort of login message and then present a prompt, at which you can type commands which the server will carry out. Some servers will offer you on-line help; others might not. If you are in doubt about what to do next, consult your system administrator.
- Logging out: When you have finished your session, you should log out by typing the server's own logout command. This might vary between servers; if in doubt, try logout or exit, or consult a manual or your system administrator. When the server processes your logout command, the PuTTY window should close itself automatically. You can close a PuTTY session using the Close button in the window border, but this might confuse the server - a bit like hanging up a telephone unexpectedly in the middle of a conversation. We recommend you do not do this unless the server has stopped responding to you and you cannot close the window any other way.
- For additional documentation you can visit the Putty Web Site.
Known Problems
Please report problems to service.desk@uregina.ca. Be advised that PuTTY is considered a stable beta. If you experience problems with this software please make a note of any error messages and the conditions under which you experienced the problems prior to reporting the problems to the Computing Services helpdesk.
Changes from Previous Version
- October 23/2024: Change for Putty version 7.6, updated vulnerability info.
- A complete list of changes from version to version can be viewed here.
- August 04/2009: mobius.math.uregina.ca was added as a terminal type.
- Installer was changed so that if a terminal type was present in the registry it would not be overwritten.
- Default connection was changed to send keep-alive packet every 120 seconds.
- August 27/2009: The hercules.cs.uregina.ca terminal type was changed to match the setup requested here.
- May 14/2013: Change for Putty version 6.2
- January 10/2014: Change for Putty version 6.3
- December 13/2016: Remove XP, add Windows 10
- December 5/2018: Change for Putty version 6.8
- March 25/2019: Change for Putty version 7.1
- September 22/2020: Change for Putty version 7.4
- March 3/2021: Added link for the "Windows protected your PC" message.
- September 8/2021: Change for Putty version 7.6
- January 31/2023: Removed hercules.cs.uregina.ca & venus.cs.uregina.ca from the sessions list and added titan.cs.uregina.ca
Title: WinSCP v6.5.4 - UofR Release Notes
Applies to: Installers of the UofR packaged WinSCP 6.5.4
Section: General
Owner: Manager, Network & Communication Services
Last updated: 03 November 2025
Introduction
WinSCP is a freeware file transfer and directory maintenance program that allows connections between a client PC and a unix server. This program uses SSH to provide a secure encrypted session between the PC and the server. Encrypted sessions such as this protect end users from sniffing (eavesdropping) of their network traffic and passwords by crackers and other technically savvy users. Users connecting using an unencrypted wireless connection are particularly vulnerable. Use of this program instead of FTP is recommended for everyone connecting to University of Regina servers and computer equipment, especially those users who connect to the network via wireless.
Licensing
WinSCP is licensed under the GNU General Public License. Additional licensing details can be found on the WinSCP website at winscp.net
Requirements
WinSCP runs on Microsoft Windows version 11 or later. The only versions of Windows that Computing Services supports are Windows 11 Professional. While it is believed that the installer for WinSCP provided by the UofR will run on Windows versions other than those two, it has not been tested on those other versions. You must have a minimum of 10 megabytes free on your "C" drive for the UofR provided installer to run.
Installation
To install, first ensure you are logged into your system with an account that has administrative privileges. Then download the UofR_WinSCP_Installer_6.5.4.exe installer from Information Services downloads. When the download completes, run the installer. If you see a "Windows protected your PC" message please see instructions for handling this message.
You will be prompted to start the install and accept the license agreement. Once you have done that, the program will be installed. A Winscp group will be added to the Start Menu and you will be able to launch WinSCP from the Start Menu.
During the install, it will attempt to detect if you had previously installed WinSCP using a UofR installer. If you had, it will attempt to migrate any of your host names from the old version to the new version. The "Secure Copy Client" in the URCOMM group of the Start Menu will be removed as it refers to the old version of WinSCP.
Uninstallation
WinSCP can be removed via the "Add/Remove Programs" icon in the Windows Control Panel.
Additional Documentation
- After installation an icon will be present in the WinSCP group of the Start Menu. Double clicking the icon will launch the program and display a screen of default host sessions. Double clicking on the desired host will display a username and password screen. Entering a valid username and password for that host and clicking login will start your session.
- The first time you connect to a host you will receive the server's encryption key and be prompted to store it in the registry. This is normal. After you save this key, it will remain in the registry and you should not be prompted again. The only exceptions to this are the public labs on campus (where the user registry is regularly deleted on logout) and when the server administrator changes the encryption key. If you are prompted to re-accept the key and you are not in a lab and you haven't been previously warned that a server key will change, please cancel your login and contact the network administrator immediately.
- For additional documentation you can visit the WinSCP Web Site.
File Permissions
- By default when files are uploaded to a host their permissions will be set to allow access by the file's owner only. These permissions are a good default except in the case where the files are part of a web page. For all files in your public_html directory you will have to give read access to all persons before your web site will work properly. You can do this two different ways: You can transfer the files to the host and change each file's permissions one by one by right clicking on the file and clicking on the properties. In the properties page for each file, ensure that the owner, group, and other permissions all have check marks next to the letter R.
- You can change the default transfer mode for all files using the following procedure: Select a file on your PC that you wish to transfer to the server.
- Choose Preferences from the Options menu at the top of the screen.
- Click on transfer in the left pane of the preferences window.
- Select the box next to Set permissions.
- Click the elipsis box under Set permissions.
- Select the new permissions you want for all file transfers.
- Click Close.
- Click OK.
Known Issues / Support
If you experience difficulty installing WinSCP, please contact the IS Service Desk at 585-4685 or service.desk@uregina.ca.
Revision History
v2, 2009-08-28, Mobius.math added as session; elvis.phpt session removed; hyperion session changed to use SCP instead of SFTP; default rights are set to only Owner R/W.v3, 2012-03-26, Fix link to WinSCP web site; Correct the name of the installer file.
v4, 2015-12-02, Update for WinSCP 5.5.5
v5, 2016-12-13, Remove XP and add Windows 10 as supported.
v6, 2019-10-25, Update for WinSCP 5.15.3
v7, 2020-02-13, Update for WinSCP 5.15.9
v8, 2021-03-03, Added link for the "Windows protected your PC" message.
v9, 2023-01-31, Updated session lists; removed hercules.cs.uregina.ca & venus.cs.uregina.ca; added titan.cs.uregina.ca
v10, 2025-10-31, Updated version to 6.5.4.
v11, 2025-11-03, Updated Windows version info.
- This guide will show you how to install Sophos Central Antivirus on non-managed Windows for University of Regina systems. This installation is not required for computers in University of Regina labs, Evergreen Systems, or computers with
ZenWorks installed. - The purpose of this guide is to allow Windows users of unmanaged systems to install and maintain an updated Sophos Central application, which replaces previous Sophos versions. Sophos Central effectively scans
system for viruses and other malware. - Sophos can only be installed on University owned computers, such as research funded, APEA purchased, or departmental assets. Sophos is not permitted to be installed on personally owned, or home computers.
- Installation is provided only to employees (faculty/staff) of the University of Regina.
- Sophos is the recommended and supported antivirus application for use on
University of Regina owned Windows systems. - Sophos Central will automatically update whenever it is connected to the internet.
Installation Requirements
University owned Windows computer which is unmanaged- Supported Operating systems:
- Windows 8/8.1
- Windows 10
- Dual core processor
- 2GB RAM
- Sophos requires that you have an active uregina.ca account username and password with employee permissions with the University of Regina for the initial installation download from the website.
- An account on your computer with installation privileges
- An internet connection
To remove any other antivirus software on a Windows computer
- Click on the Start button.
- Search for "Add or Remove Programs".
- Locate your current antivirus software in the Apps & Features list.
- Uninstall that application.
- Restart your computer.
- It is recommended to restart your PC before installing new antivirus software as some antivirus software components may be retained in system memory.
Installation Steps for employees
- Go to Downloads
- Click the link to download the Sophos Central Antivirus package for Windows
- Input your username and password when prompted by your web browser when downloading
- Save the file "SophosInterceptXSetup.exe" to your computer
- Once downloaded, double-click the "SophosInterceptXSetup.exe" installation package
- If you see a "Windows protected your PC" message please see instructions for handling this message.
- The installer will start, and perform pre-installation checks, which may suggest some necessary steps such as:
- Uninstalling other Antivirus packages
- Closing applications that could interfere with the install
- Apply any pending restarts before installing
- Once all checks have passed and the installer is ready, click "Install" to proceed.
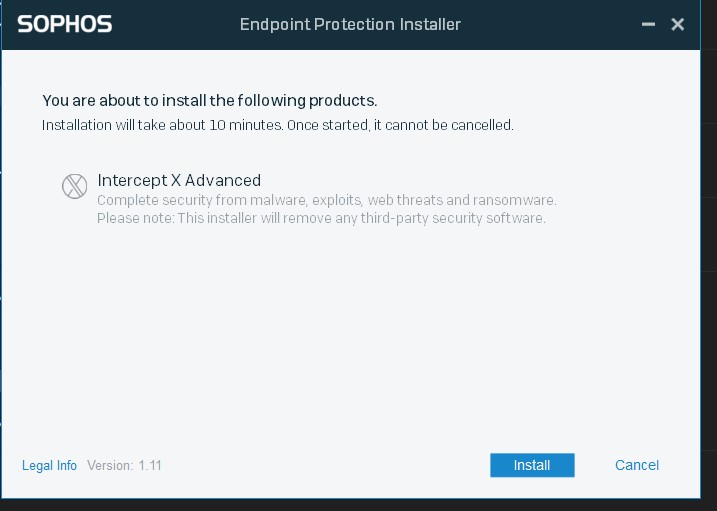 8. The installer will download the latest antivirus software files from Sophos to your PC and register it with our license.a. Please wait as the installer sets up your new antivirus software, it can take up to 10 minutes to install.
This guide will show you how to install Sophos Central Antivirus on macOS X for employees with non-managed work stations.
Installation Requirements
- System running a supported operating system: macOS 10.12 to10.15, and 11.0 +
- Minimum 2GB RAM
- An account on your computer with installation privileges
Remove any other antivirus software before installing Sophos
- Open Finder
- Click “Applications”
- Locate your current antivirus software in the folder list then:
- Use the uninstaller
- Move the application icon to the trash
- Click the application icon in the folder
- With the icon selected
- Select “File”
- Select “Move to Trash”
- Restart your computer
- It is recommended to restart your PC before installing new antivirus software as some antivirus components may be retained in system memory.
Installation Steps
- Go to Downloads
- Click the link "Sophos Central AntiVirus for MacOSX 10.12+" to download the software
- Input your username and password when prompted
- Save the file "SophosInterceptXInstall.zip" to your computer
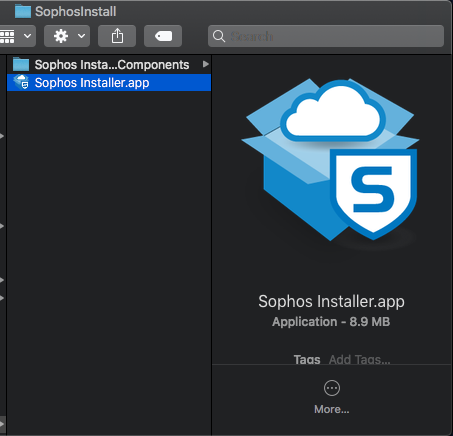
- Once downloaded, open the archive package, inside should be “Sophos Installer.app”
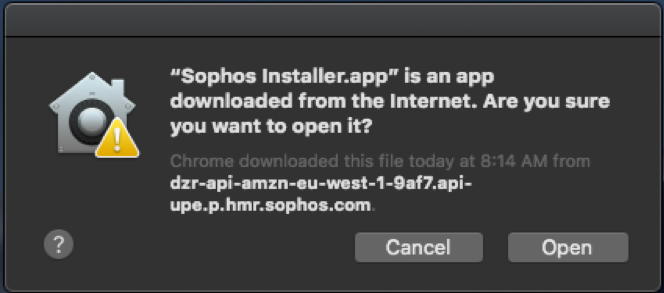
- Double click the app, you may receive a warning that this file was downloaded from the internet, click “Open” to proceed
- The installer will start and display a welcome prompt
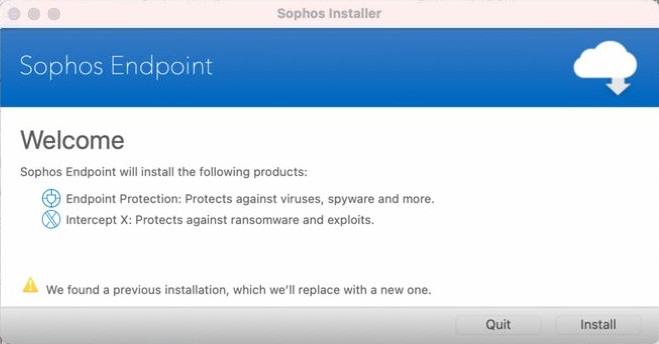
- You may or may not see We found a previous installation .... Go to the next step.
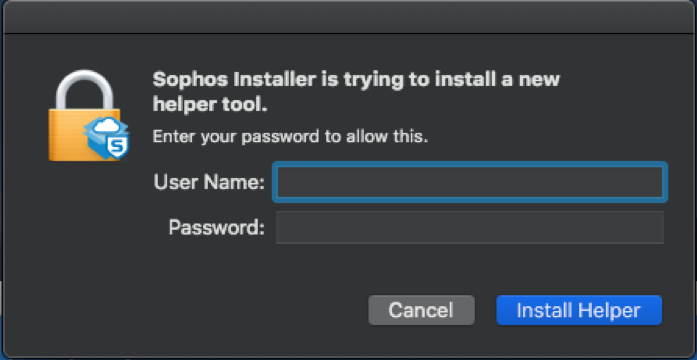
- Click Install to proceed, your computer will ask you for your credentials to authorize this installation:
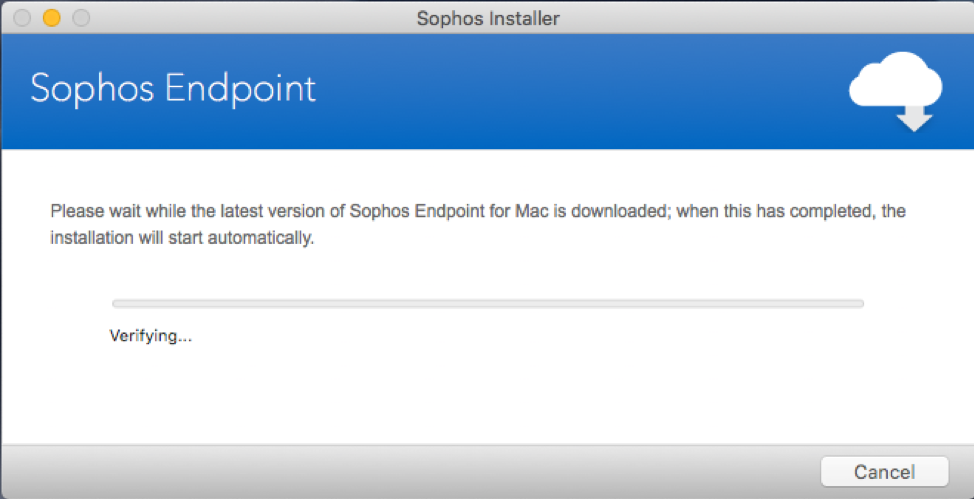
- Please wait patiently as the installer sets up your new antivirus software, it can take up to 10 minutes to install
- Once complete, the installer will display a success message and should automatically register with our license:

- Click "Quit" to close installation window.
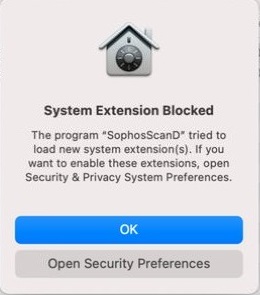
- If you are prompted by Sophos with a message "System Extension Blocked" click "OK".
After installing Sophos Antivirus
- In the Apple "System Preferences" window go to "Security & Privacy"
or click "Open Security & Privacy" if you see a popup: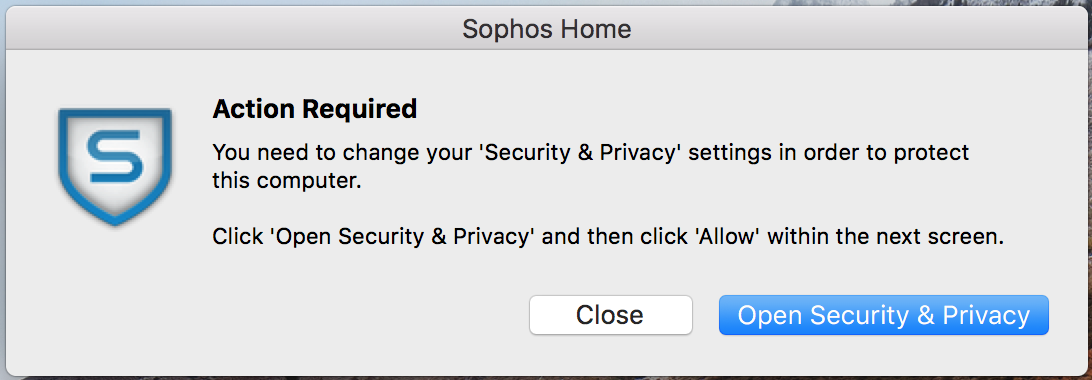
- Near the bottom of the "Security & Privacy" window, there will be a list of the blocked Kernel Extensions (kexts) by Sophos.
- Click the Lock icon to make changes, then Click the "Allow" button.
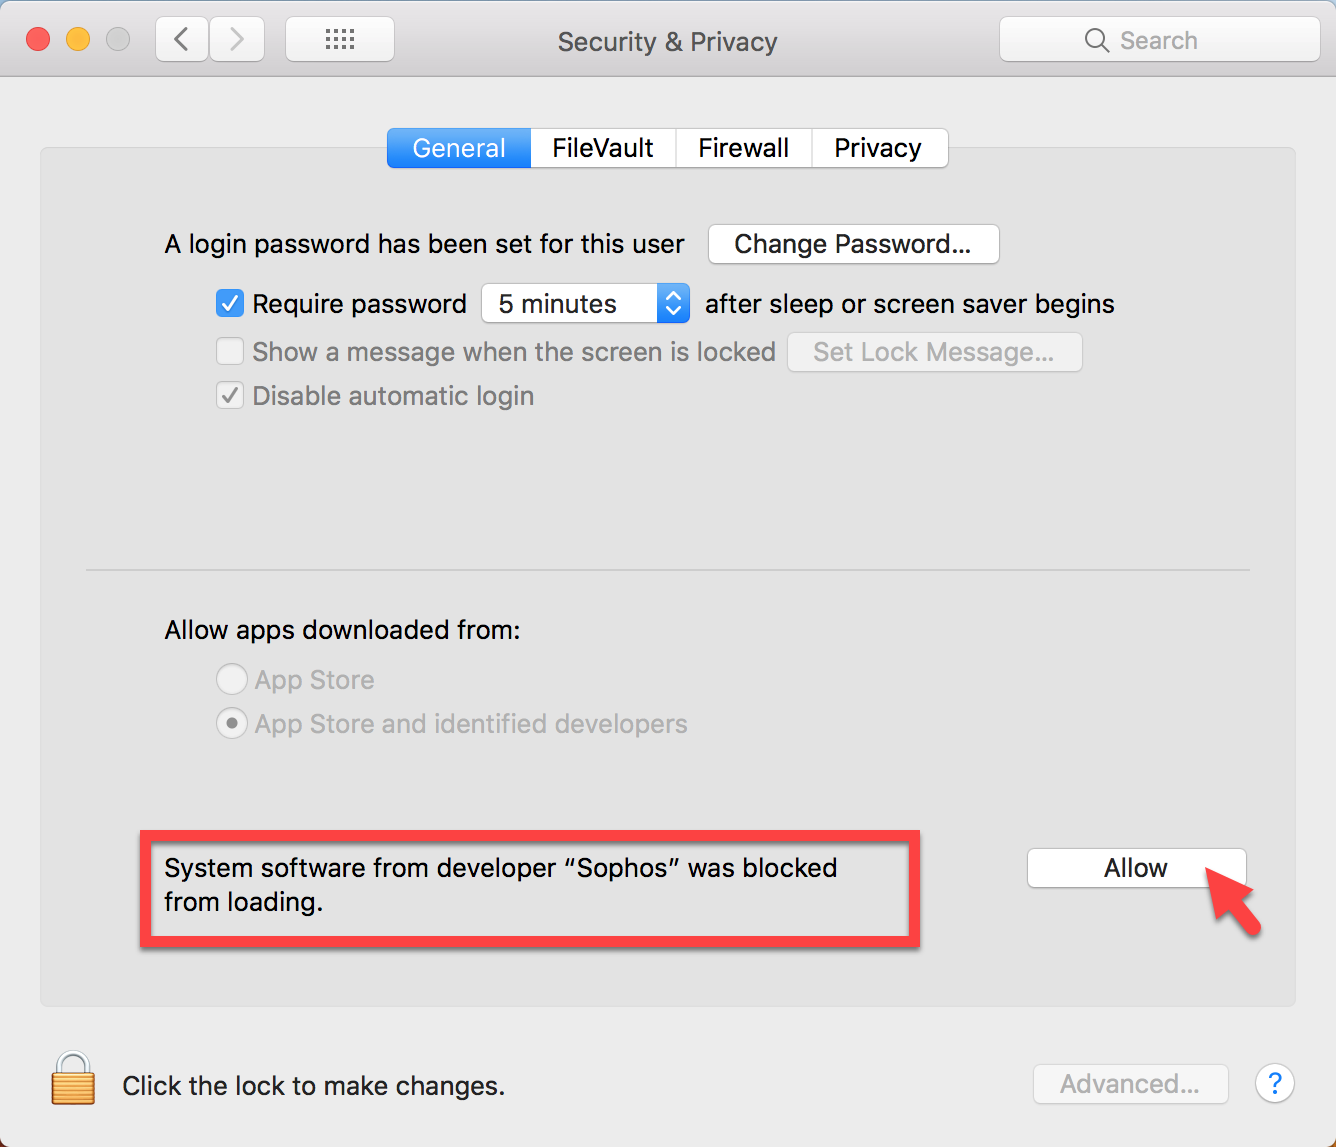
- Note: Once authorized, all future Sophos kernel extensions are allowed, even after the uninstall.
- This step is not needed again on a reinstall.
- Kernel extensions already installed during an upgrade from MacOS 10.12 are automatically authorized.
Additional Requirements for MacOS 10.15 and MacOS 11+
The change to System Extensions in Big Sur requires additional security permissions beyond what is detailed in the above instructions for macOS 10.12-10.14. Apple has enforced these permissions, and they cannot be added automatically.
If using MacOS 10.15 or MacOS11+, the following additional installation steps are required. Without these steps, malware scanning and web protection will not function.
- During install or after upgrade to Big Sur (With Sophos Endpoint installed), a prompt will display to allow the System Extensions for SophosScanD and SophosWebNetworkExtension.
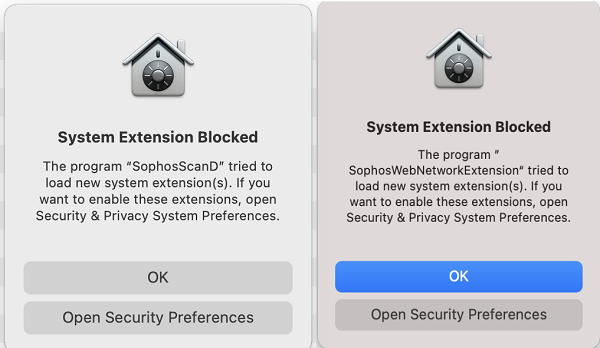
- Click "Open Security Preferences" and select to Allow both Extensions.
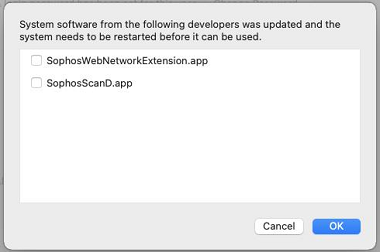
- A notice will open about restarting the services. Click to select both checkboxes, then click OK.
- Close the Security and Privacy window.
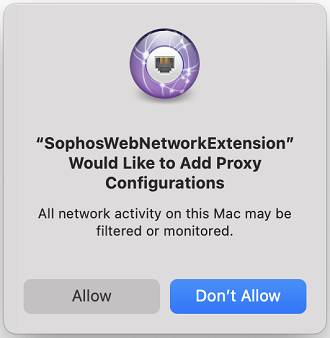
- A notice will open for allowing the Sophos Web Extension as a Proxy. Click Allow.
- The Sophos Full Disk Access required notification will appear. This is due to a new process required on Big Sur. This pop-up will occur (if Notifications are enabled) on install, and every 30 minutes if the permissions are detected as incorrect. Clicking on this notification will bring up a window that allows you to set permissions quickly.
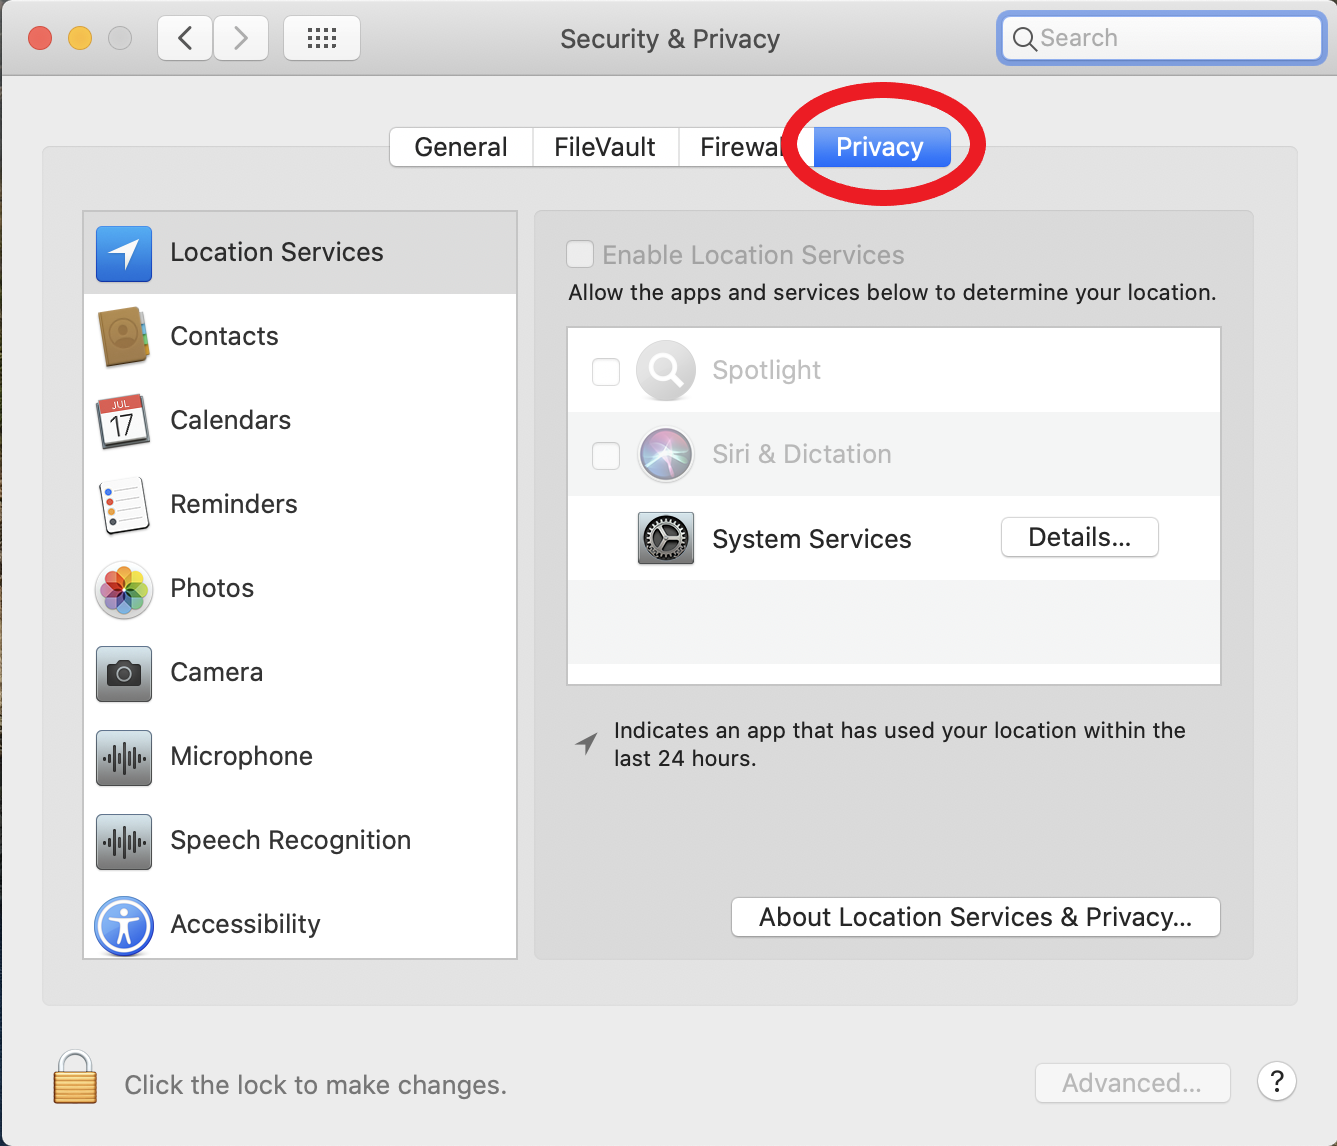
- Click "Details" then click the link: Open "Security & Privacy" Preferences
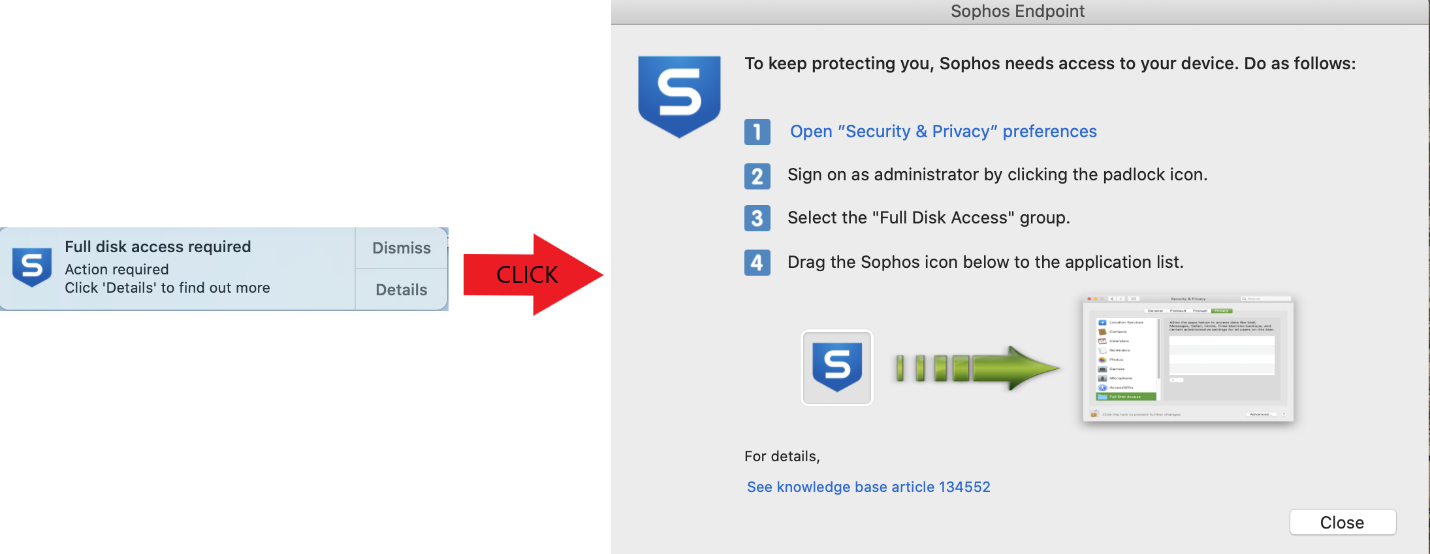
- Click the Privacy tab if it is not already selected
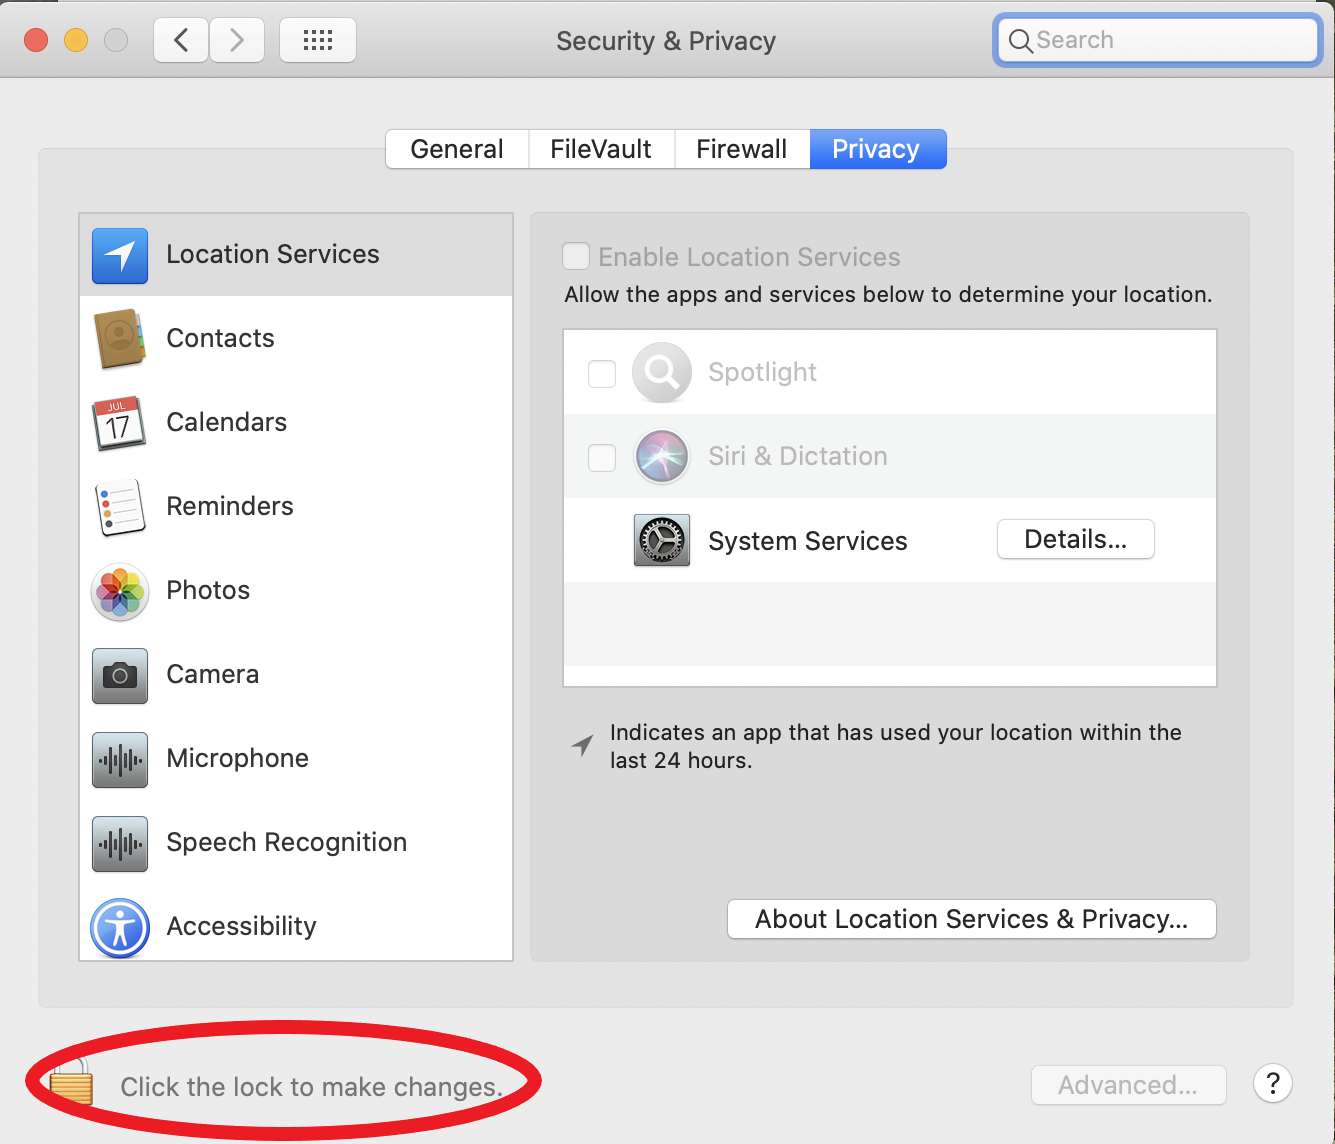
- Click the lock in the lower-left and authenticate to make changes.
- Select Full Disk Access on the left side (You will need to scroll down)
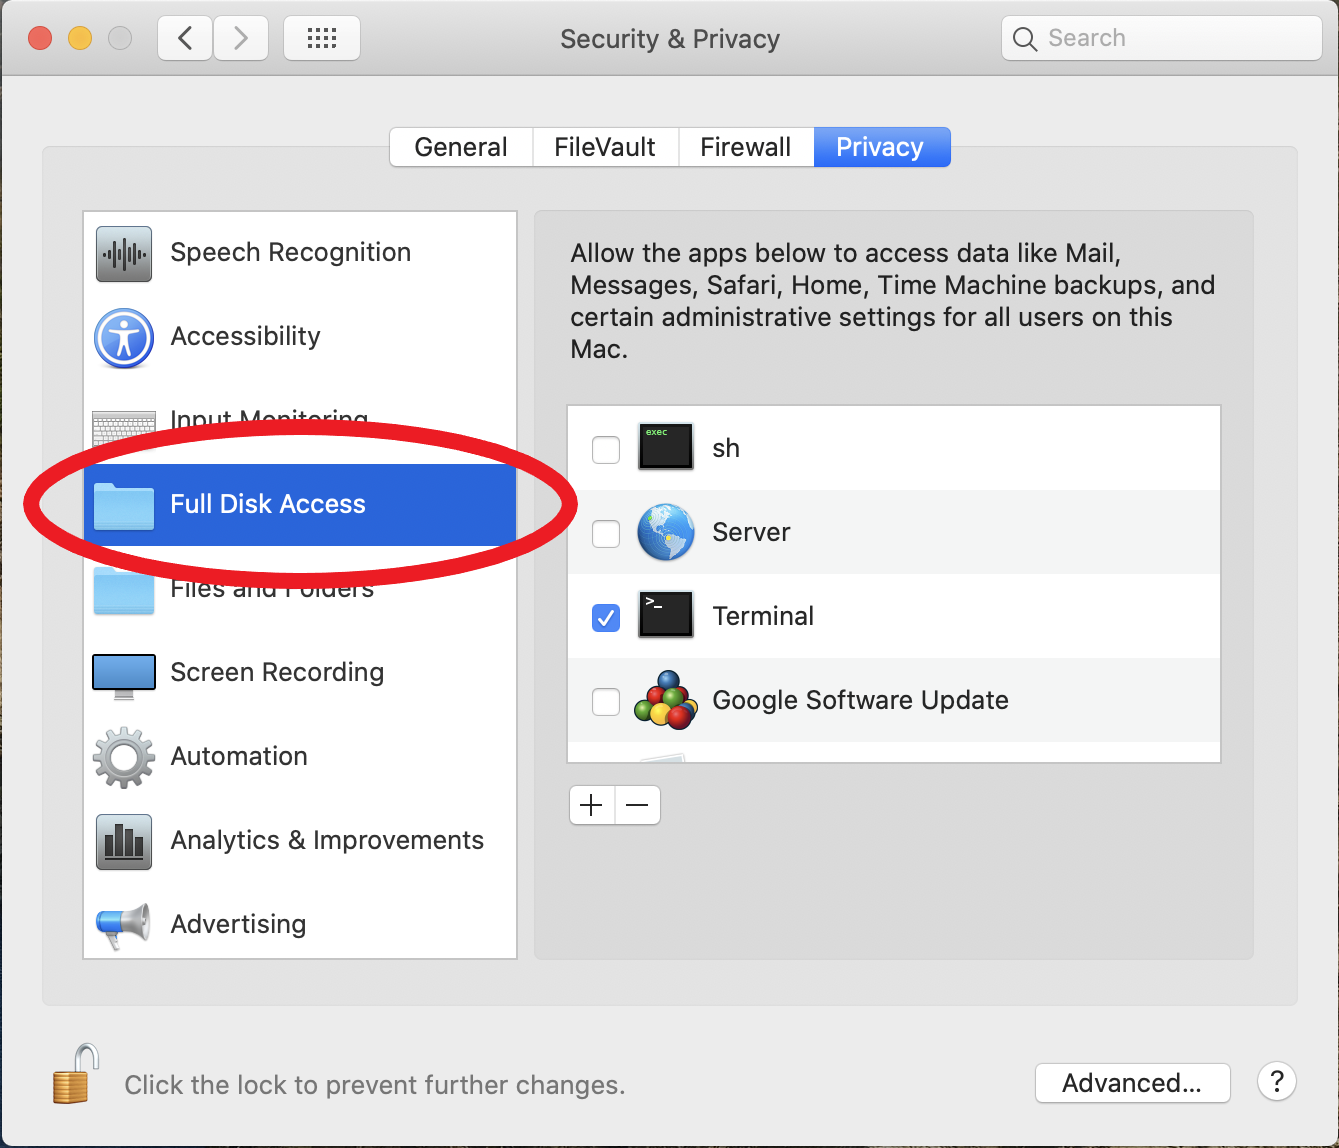
- Drag the Sophos Icon from the Message to Security and Privacy
- You will get a message ""Sophos Endpoint UIServer" will not have full disk access until it is quit." You can select Later or Quit Now. Either will work (Later will need a restart to give the UI full access. This does not impact protection).
- Close Security and Privacy.
- Click "Details" then click the link: Open "Security & Privacy" Preferences
- In some circumstances, the OS will prompt for a restart to enable System Extensions. You must restart for Sophos to be activated fully.
For questions or installation assistance, please contact IS Service Desk
Release Notes for WSftp 5.08 UofR release 2002121100
To install, locate the exe file you downloaded and double click on the exe to start the install.
Software Description
WSftp is a graphical file transfer client that supports the standard file transfer protocol. It allows files to be uploaded/download from servers on campus and on the internet that support the ftp protocol.
Requirements
- A IBM compatible computer with Pentium processor or better
- Microsoft Windows 95/98/ME/NT4/2000/XP.
- 16Mb of RAM(32Mb of RAM highly recommended)
- 3Mb of free disk space
Licensing Terms
WSftp is free for use for non-business use.Additional Documentation, see the support page for manuals, FAQs, etc.
Known Problems
Please report problems to service.desk@uregina.ca. Under some conditions, even if you enter your password in the connect dialogue box you will be prompted for it once you connect.